Attention
This document is no longer being updated. For the most recent documentation, including the latest release notes for version 6, please refer to Documentation Version 7
Operations
The operations module is all about orchestrating and monitoring the loading process of staging and data vault loads.
Status
The status lineage allows to get an immediate overview of the current loading states. As a difference to the data lineage, its flows are not colored by the system, but the state of each staging and data vault load.

- Search Bar
Use the search bar to filter the status-lineage. Filtering works the same as in the data lineage.
- Zoom Toggle
Set zooming: Will rescale the lineage to be able to see all node labels. Reset Zooming: Will rescale lineage to current window size.
- Circular Dependencies
Once a filter is applied, switch to hide business vault dependencies from the lineage.
- Loads Filter
Only show loads and related objects for the selected load states.
Jobs
The jobs module is the heart, automating and orchestrating the data flows in the Datavault Builder. The module allows to define multiple different packages of staging and data vault loads, giving you the maximum flexibility to define your custom jobs. However, if you compose manual jobs, the Datavault Builder will help you create an execution order by taking away the work of manually defining the correct and most efficient loading order. Focus on the loads to include in a job, and the Datavault Builder will optimize and parallelize the loads as good as possible.
- Definition
A job is a package of loads (datavault / staging) on the granularity of one source system. It is possible to have multiple jobs per system, but not multiple systems per job.
- Usage
At system creation, a default job is created, automatically taking up all newly created loads. Once you start modelling, in the background the job is automatically updated with each modification in your data integration process, in the end allowing you to directly trigger a reload of your integration flow.
Besides all the Automation, many parts can be customized, as you can see in the following chapters.

- Job List
When clicking into the search-bar, a drowdown will appear, listing all existing jobs in the Datavault Builder.
- Job Load Status / Load Selection
- On the canvas, the loads within a job as well as the dependencies are visualized.In the status view, the color indicates the current status for each load. When using the view toggler, the selection view allows you to compose your custom job.
- Circular Dependencies
Once a filter is applied, switch to hide business vault dependencies from the lineage.
- View Toggler
Click onto the toggler to switch between load status and load selection on the canvas.
- Loads Filter
Only show loads and related objects for the selected load states. Can also be used to filter included / excluded loads for the job.
- Job Actions

Circled Arrow: Initiate Job Load
Switch: Enable/Disable Job
Screw nut: Edit Job
Trash bin: Delete Job
- Job Details
Lists when the job started the last time, how long it did run as well as the next schedule. If you have multiple schedules defined for the same job, only the next run overall will appear.
- Schedules
Lists defined schedules and lets you add another schedule to a job.
- SQL Query
It is possible to define custom SQL commands, which will be executed every time the job completes. This allows you for instance to trigger the copy of data into another database or programm notifications about job status. Please see the example below:
DO $$
DECLARE
    _result TEXT;
BEGIN

    IF ({{job_completed}}) THEN
        _result = dvb_core.f_execute_update_fdb_query_with_log(
            query => 'EXECUTE sp_whatever',
            function_name => 'PostSqlScript',
            action => 'Execute stored procedure',
            attribute_list => ''
        );
        IF (_result IS NOT NULL) THEN
            RAISE EXCEPTION 'Error while exeuting stored procedure: %', _result;
        END IF;
    END IF;

END;
$$;
- Triggered by / Triggered on Completion: Jobs
Lists and allows to define dependencies between jobs, which causes jobs to run after onea nother.
Creating a Job
As stated before, a default job is created on system creation. This default job is configured to automatically include newly created loads. The default job can be modified or deleted if needed.
Also, it is possible to create more jobs for a system. This can be the case, if only parts of the source should be loaded more often than others to improve the effectivety of the integration flow.
- Steps
Navigate to the jobs module
Click onto
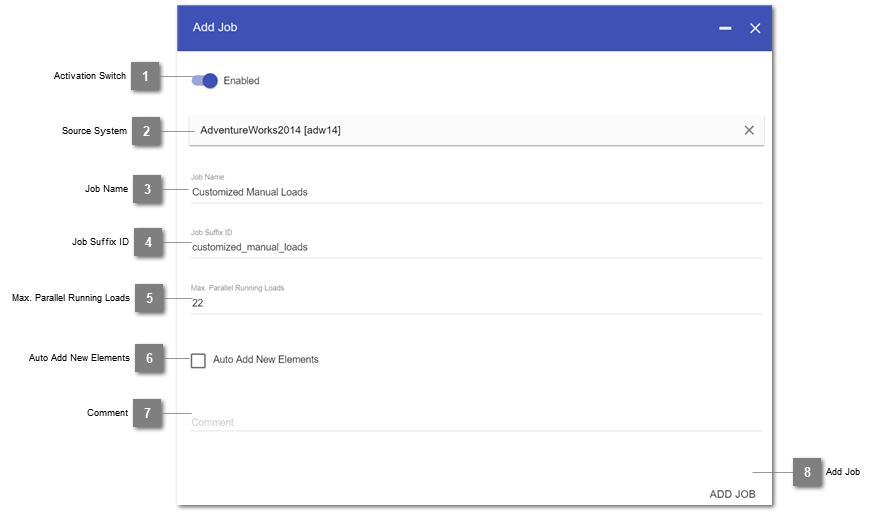
Add JobFill out the dialogue explained below
Complete the creation dialogue.
Continue with defining individual loads, schedules and job dependencies.

- Activation Switch
Enable or disable the job as a whole.
- Source System
Select a source system which was previously created in the staging module.
- Job Name
Displayed name of the job.
- Job Suffix ID
Partial technical ID of the job. Will compose the job ID in form of:
[Source System ID] + ``_j_`` + [Job Suffix ID]
- Max. Parallel Running Loads
The maximum number of loads that are able to run in parallel in this job, where “-1” means unlimited. Available load slots are always limited by the system config parameters.
- Auto Add New Elements
When creating a new staging table or data vault element, the loads can automatically be added to a job. Enable this continuous integration by ticking the box. Otherwise new loads need to be added manually.
- Comment
Custom notes about the job. Will appear in the documentation.
- Add Job
Button to complete the job creation.
Defining loads within a Job
A job can be configured in two ways:
Automatically take up new loads
Only contain manually specified loads
Note
This behavior is as well reflected in the state export. E.g. if you have a “manual” job, the jobs loads are the ones being executed. If you have an “auto” job, then the jobs loads are the ones being skipped.
If a load is removed in the Datavault or Staging, the load will as well be automatically be removed from the job. Be aware, that if you have previously excluded a load from a job, then removed it from the data vault and added it again, it has to be disabled again.
You can as well reconfigure a job from automatically adding new loads to manually selecting loads. In this case, the state is preserved, meaning that all loads added to the job up to this point will directly be included in the manual job.
- Steps
Go to the jobs module and open up an existing job from the list
Toggle the view to activate the “Selection”-Appearance of the canvas
Click onto a load to add it to / remove it from the job
When you are on the selection view, you will notice, that the connections in the lineage are colored in three different ways:
Purple: Selected load, will be executed on job execution
Dark Gray: Available load, could be selected, won’t be executed on job execution
Light Gray: Independent data flows, can’t be selected, represent virtual layers or loads from different source systems.

The selection composer will only allow you to select loads of the underlying source system of the job. If you would like to initiate dependent loads on job completion, please have a look at job dependencies.
Schedule a Job
The Datavault Builder consists of an integrated scheduling agent, allowing you to directly manage and configure the automation of reloading processes within the environment.
- Definition
A schedule will trigger one individual job on a given timing.
- Steps
Navigate to the jobs module, open an existing job and click onto the located behind “Schedules” in the Job properties slider.
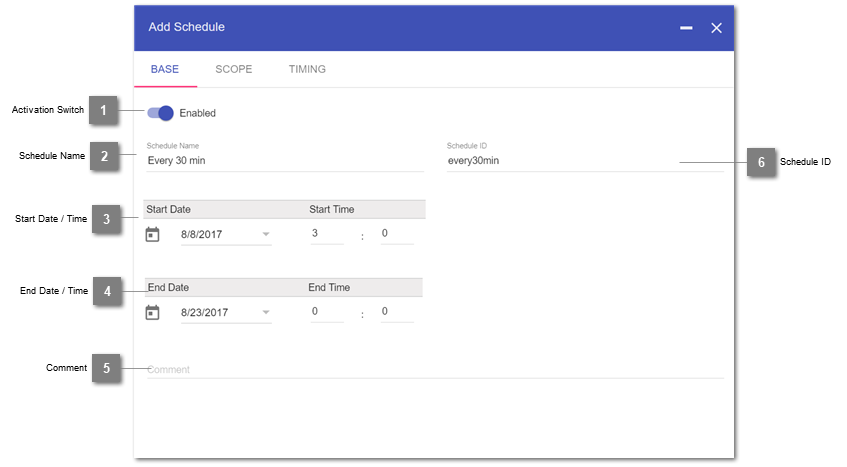
Fill out the Base tab, allowing to define a start and end date.
Fill out the scope, defining to load as full- or delta-load.
Indicate the timing to initiate the job at.
Note
It is possible to have overlapping schedules, as well as job dependencies leading to a job possibly being initiate while already loading. To prevent the system from being queued up, the job will first check the existence of a running job and not initiate a second time.
Base

- Activation Switch
Enables/Disabled the schedule.
- Schedule Name
Displayed name of the Schedule.
- Start Date / Time
Only run the schedule past this initial date and time.
- End Date / Time
Only run the schedule before this final date and time. Can be left out if infinite.
- Comment
Individual notes about the schedule.
- Schedule ID
Technical ID of the schedule. Is directly derived from the Name but can manually be edited.
Scope
The scope is the place where you can define a schedule as loading full or delta in the staging.
In case of a full load, all data from the contained source tables in the job will be copied.
Note
If a schedule is configured as delta load and has dependent jobs which will be initiated, then the parameter-values from the first job triggered by a schedule will be passed down the the next job to be used in the delta-load.

- Schedule Type
Defines to load full or only delta. If full load, then no parameters have to be specified.
- Delta Load Parameters
- Name: Type in the name of the used parameter in the Delta-Load-Where-Clause of the staging table(s)Value: Assign a fix or dynamic value to the parameter, which will be filled in on each execution
Note
Pay attention to confirm the adding of a new parameter using the plus-symbol.
The value can as well be the result of a function call. For that purpose, three execution environments are possible:
Execute on source: Just add the functions to the value, it will be added to the where-clause and passed as is to the source
Execute in the Datavault Builder Core: For your convenience default functions can be added with the prefix
DVB_CORE_FUNC.*Execute on your client-database: Prefix your value statement with
DVB_CDB_FUNC.and it will execute the code after it to be run on the client-database.
First, you have to create a function. For instance, create your function in schema
dvb_functionscalledget_transaction_id. Then, you can use the created function in the value field as follows:DVB_CDB_FUNC.SELECT dvb_functions.get_transaction_id():
Hint
Make sure, that the function call returns a single value (e.g. text/varchar, int) as a result!
See also
This just created parameter
transaction_idcan then be used in the Delta Load Clause when adding a staging table:
- Description
Variable
transaction_idis filled with the result of the previously created functionSELECT dvb_functions.get_transaction_id()which in this case is a number.So you compare the
transaction_idfrom the result with themax_transaction_id(which is a number as well)
In this example, only those rows are loaded where
transaction_idis greater thanmax_transaction_id.
Hint
If you compare string values you need to add quotation marks in the Delta-Load-Where-Clause field.
If you compare dates, you have to explicitly add a cast. Here’s an example with oracle syntax:

Important: Place quotation marks around the curly brackets as well to prevent errors when casting a string to a date.
Timing
In the last step of adding a new schedule to a job, the timing is assigned.
- Available options are:
Every Minute
Every Hour (minute)
Every Day (hours,minute)
Every Week (weekday,hour,minute)
Every Month (monthday/lastofmonth,hour,minute)
Every Year(month,monthday/lastofmonth,hour,minute)
Note
It is possible to also select multiple options within one step, as displayed in the example below, where the job will only run during the workdays and working hours.

- Timing Selection
Definition of the timing for a schedule. Multiple selections within a row are possible.
- Add Schedule
Button to complete the creation of the schedule.
Job dependencies
Jobs can not only be triggered by schedules, but as well by other jobs. In this case, the staging load type (full / delta) as well as the parameters are inherited from the triggering job.
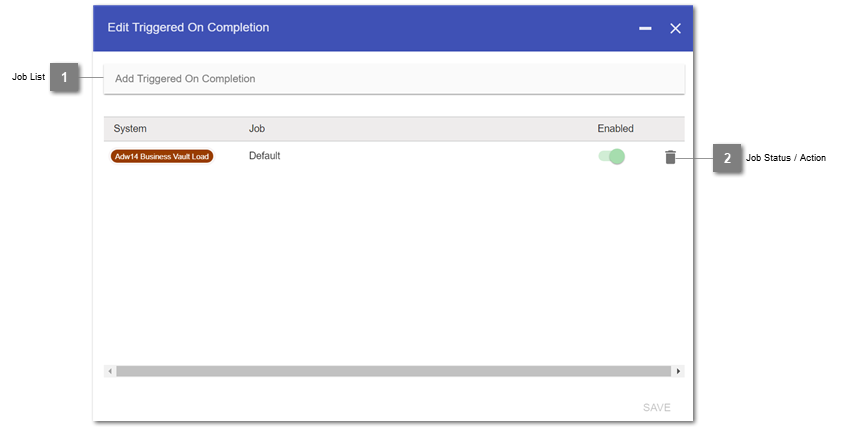
The dialogues for the jobs Triggered by and Triggered on Completion work the same way, so we will only show one of both below.
- Definition
A dependent job is triggered on completion of another job.
When adding a job to Triggered on Completion, that job will run after the first job is finished. Therefore, the triggering job will also appear in the Triggered by jobs list of the dependent job.
Direct circular dependencies are not possible (a dependent job being the trigger for its triggering job).
However, indirect circular dependencies are possible.

- Job List
Search the list for a specific job.
- Job Status / Action

Toggle: Indicates, whether the chosen dependent job is activated. For enabling/disabling open up the job.
Trash bin: Removes the dependency.
Post-Job SQL Query
Besides Job-Dependencies, the Datavault Builder as well supports execution of Post-Job SQL Queries, allowing to perform customized actions once the loading process of the job is finished.
- Definition
A Post-Job SQL Query is custom code, executed within the job, after all loads, but before triggering dependent jobs.
- Steps
Navigate to the jobs module, open an existing job and click onto the edit-symbol located behind “Default SQL Query” in the Job properties slider.
Fill out the Pop-Up, defining your custom code.
Activate the SQL Query.
- Configuration
In the dvb_config.config, you can define a paramter called
run_job_sql_query_on_core, allowing you to specify, whether the query will be executed on our core, or on the client/process database.- Example
- The following code shows, when the code execution of the post-jobs sql query on the core makes sense.
Note
To run this example, set
run_job_sql_query_on_corein the config toTRUE.In this case, the job is loading data from CSV-Files. Once those files are loaded, they should no longer be in the source folder, otherwise they would be reloaded each and every run. Therefore, we will move them into a subfolder after the load.DO $$ DECLARE _moved_files_count INTEGER; BEGIN IF ({{job_completed}}) THEN _moved_files_count = dvb_core.f_move_files('test*.csv', 'loaded_files/bak'); RAISE NOTICE 'Post Job SQL Script moved % source files.', _moved_files_count; END IF; END; $$;As you notice, for the movement we use the core-function
dvb_core.f_move_files, specifying which files should be moved into what directory. Also, we only move the files away, if the job was actually successful, meaning no load failed. For this purpose, the variable{{job_completed}}can be used, which will automatically be evaluated on execution time by the core.
Deleting a job
Before deleting a job, make sure, that it is not needed anymore because removing a job will also directly remove:
All schedules defined for the job
All SQL Queries within a job
All job dependencies
Inclusion logic for manually disabled / enabled loads within a job
Load States
The are four basic load types in the Datavault Builder:
Staging load
(St): A single staging table load is performed.System load
(S): All staging tables for a system are loaded.Data Vault load
(DV): A single load into a Data Vault object (Hub / Link / Satellite).Job load
(J): A (group of) Staging and / or Data Vault load(s).
Returned State |
Meaning |
Summarized Load Step |
Applicable to |
|---|---|---|---|
Initiating |
Finding load parts to execute |
Running |
|
Waiting |
Waiting for a free processing slot |
Running |
|
Loading |
Staging Data or Loading the Vault |
Running |
|
Incomplete |
Parts of the load failed |
Failed |
|
Failed |
The load failed |
Failed |
|
Succeeded |
The load was successful |
Succeeded |
|
