Attention
This document is no longer being updated. For the most recent documentation, including the latest release notes for version 6, please refer to Documentation Version 7
Deployment
The deployment module is all about the state of the developed model. With the module, the state can be exported, versioned or also imported onto another environment again. Also, comparisons between the logical model of one environment with another enviornment is possible. Lastly, to bring detected changes from one environment to another, either direct deployment as well as change script generation is supported.
Getting started

- Connect Environment
Lets you connect to a remote environment or import an existing, locally stored state of a logical state.
- Export Local Environment
Retrieves the logical state from the connected environment and packages it into human readable jsons within a zip file.
Export an environment
- Definition
When exporting an environment, a state-archive is generated. This zip-file contains the information about the current data integration flows on a logical level. As the logical state is exported as json files, the state is human readable.
- Purpose
There are several reasons to export an environment. For one, based on the export, the model can be checked into an enterprise versioning software. Furthermore, as the files are human readable, different versions can as well be externally merged and reimported into another environment.
- Steps
- You can either export the local environment or also a remote environment after connecting to it.a) Open up the deployment module and click onto
export local environment. A zip file will automatically be generated and offered for download.b) Open up the deployment module and click onto connect environment. Once connected, press the export-icon besides the connected environment to generate the state-archive.
Note
Export file is case sensitive. In case it is unzipped on Mac/Windows and has objects which are different just in casing (e.g. a staging table id), it needs to be unzipped case sensitively.
Connect environment
- Definition
An environment can either be a second instance of the Datavault Builder (e.g. Dev/Test/Prod) or an exported logical state of the implementation.
- Purpose
The goal is to either connect to a remote Datavault Builder Instance or to upload a previously exported state for comparison.
- Steps
Open up the deployment module and click onto
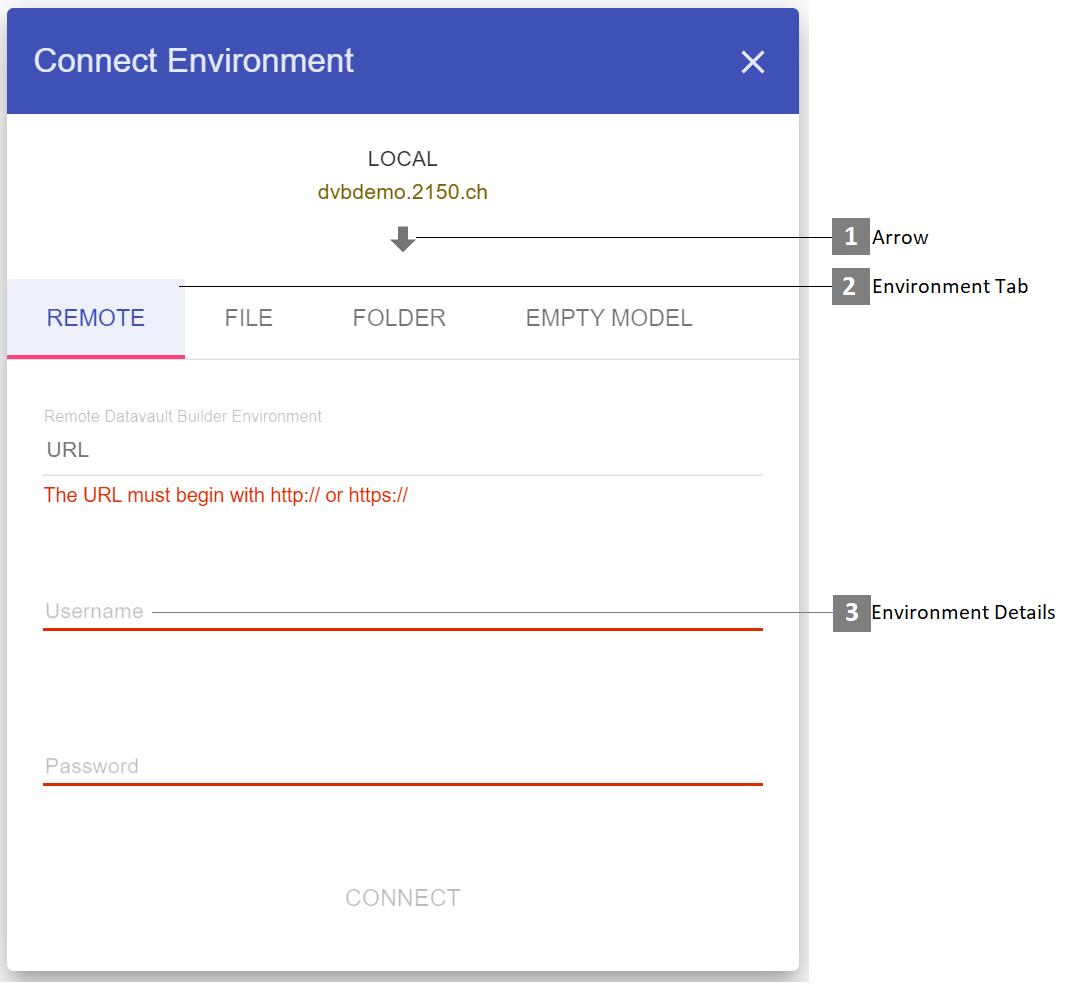
connect environment.From the environment tabs, select the environment you would like to compare to.
Depending on the environment, specifcy the connection details:
Remote environment: Specify an URL and login details.
Note
The URL must begin with
http://orhttps://and should be the URL of another datavaultbuilder webgui environment.File: Upload previously exported state-Zip-Files or JSON files.
Folder: Drag and Drop the top root folder of the previously exported, unzipped state archiv.
Empty model: Use this tab to either export or delete the local environment, depending on the arrow direction.

- Arrow
Toggle the deployment direction by clicking the arrow.
- Environment Tab
Select the sort of environment to connect to.
- Environment Details
Specify the login properties or upload a folder to connect to the second environment state.
Comparing environment
- Purpose
Once connected to a second environment, the compare view lets you see differences and either build and execute custom packages of import or export actions to rollout changes to another environment.
- Steps
Open up the deployment module and connect a second environment.
Go through the list and select the objects you would like to roll out.
Initiate the deployment through the environment actions.

- Filter List
Apply a filter to only compare certain elements of the implementation
- Deployment package options

The operation column shows you, what action is needed to get the target environments element into the same state as the source environment. With the checkbox you can select which elements should be included in the rollout. When clicking the checkbox, a dependency check is performed which supports you with rolling out dependent objects.

- Diff Viewer

When clicking onto an object in the list, the diff viewer will show you the states of both sides and in case of differences also the changes in the middle part.
Deploying objects

- Deployment way
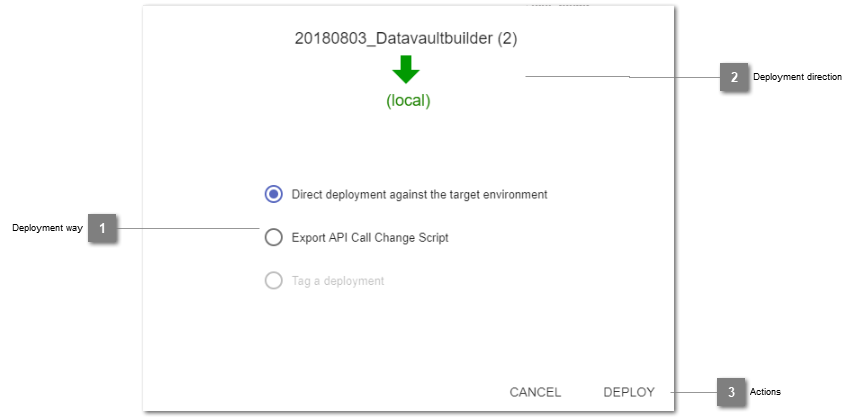
Specify which way to roll out the previously build deployment package.
- Deployment direction
Reminder of the direction of deployment.
- Actions
Start direct deployment / export into change script or cancel the process.
Direct Deployment
- Purpose
Instantly start the rollout of a previously defined deployment package to propagate changes onto an environment.
- Steps
Open up the deployment module connect a second environment.
Initiate the deployment and select the option for direct deployment.
Script based deployment
- Purpose
Script based deployment is usually the way to deploy in enterprise environment where specific deployment packages are created and tested before being rolled out onto a productive environment. Therefore, for the rollout a package of API-Calls is generated, which can then be executed against a target environment.
- Steps
Open up the deployment module and connect a second environment.
Compose a deployment package and initiate the deployment.
Select the option to export a deployment script package.
This exports a file with name pattern[date]_[time]_rollout_package.zip(e.g.20180803_135742_rollout_package).In that package are two files. One of it contains environment parameters, the other the necessary API-calls.Configure files and setup required library to be able to initiate the script based rollout
in the environment file (
rollout.env), specify at least against which target to rollout and login user details. If you are rolling out source systems, you can also update their parameters according to the target environments needs.install cUrl (https://curl.haxx.se/) and jq (https://stedolan.github.io/jq/)
Invoke the rollout by calling the
rollout.shscript as described in the file (./rollout.sh rollout.env)
- Limitations
Currently no error handling is in place. Therefore, you should test the rollout against a second.
Database structure rollout
As the Datavault Builder has no separate meta-data-repository, all objects are directly created on the processing database. For the rollout, the database objects and structures can be moved between the environments by using schema-comparison-tools.
By exporting the database structures, the current states of the implementation can as well be versioned by using a standard code-versioning-software, such as SVN or GIT.
- Steps
Deploy the database structures
Deploy the content of the tables in the
dvb_config-schemaas well (as the environment configuration is stored in there)config(adjust if necessary)system_data&system_colors(adjust if necessary)auth_users(adjust if necessary)job_data,job_loads,job_schedules,job_sql_queries&job_triggers. At least the job_dvb_j_defaulthas to be present on each environment.source_types,source_type_parameters,source_type_parameter_groups,source_type_parameter_group_names,source_type_parameter_defaults> copy&paste as is.
After the deployment, depending on your used database type (e.g. MSSQL, EXASOL, ORACLE), trigger the refreshing of the metadata by executing the following query in the command line in the GUI:
SELECT dvb_core.f_refresh_all_base_views();If you have skipped to deploy parts of the dvb_config-schema, it may be necessary to:
create new users
update system configs (as most of the time in DEV-TEST-PROD have different configs) - Can also be done in the GUI
adjust jobs
Limitations
When an object is dropped in the development environment and recreated with a different definition (e.g. other data types for columns), these changes can not directly be deployed.
